h

Being Agile

Pete Hodgson's blurgh

Writing Your First Frank Test

| Comments

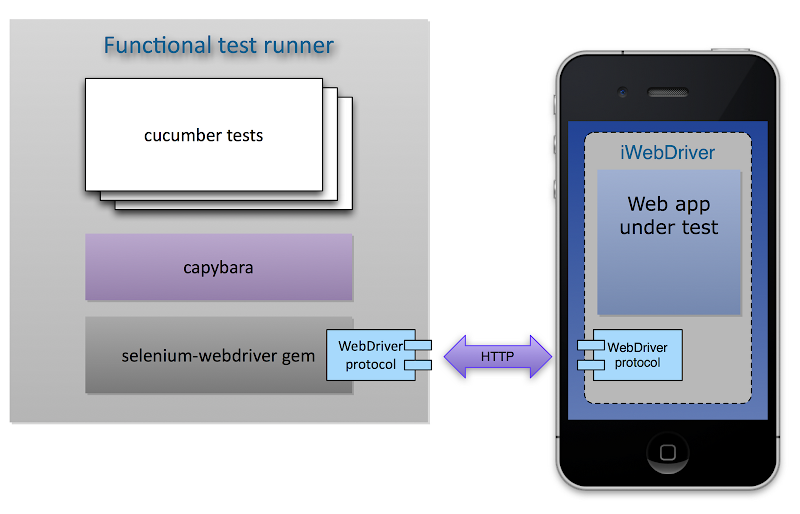
You’ve heard about how awesome Frank is and you’re all fired up about getting some automated functional testing set up for your iOS app. Now you’re ready to start writing your first test. In this article I’ll cover the fundamentals of writing Frank tests, using an open source iOS application written for the 2012 Olympic Games as an example.

get the code for your app

I’m guessing you’ll already have the code for your own app, but if you’d like to follow along with the examples in this post you’ll want to download the sample app I’m using. You’ll find it on github here. Create a local clone of that repo with git clone https://github.com/Frahaan/2012-Olympics-iOS--iPad-and-iPhone--source-code.git

Now open up the app in XCode and make sure you can run it in the simulator.

Frankify your app

Open up a terminal, and cd into the project’s root directory (the one with the app’s .xcodeproj file in it). Now we can Frankify the app as follows:

  • install the frank-cucumber gem if you haven’t already by running sudo gem install frank-cucumber. That sudo part won’t be necessary if you’re using rvm to manage your ruby setup (which I’d recommend).
  • run frank setup to create a Frank subdirectory which contains everything necessary to Frankify your app.
  • run frank build to create a Frankified version of your app.
  • run frank launch to launch the Frankified app in the simulator.
  • check that you are indeed running a Frankified version of the app by running frank inspect. This will open up Symbiote in your web browser.

Symbiote

Symbiote is a little web app which is embedded into your Frankified app. It allows you to inspect the current state of your app as it’s running. It also lets you experiment with view selectors. View selectors are how you specify which views in your app you want to interact with or inspect the value of. If you’re familiar with CSS selectors or XPath expressions the concept is the same.

Let’s learn a bit more about selectors by experimenting with our example Olympics app. I’ve followed the steps above, and am looking at the home screen of the app in Symbiote.

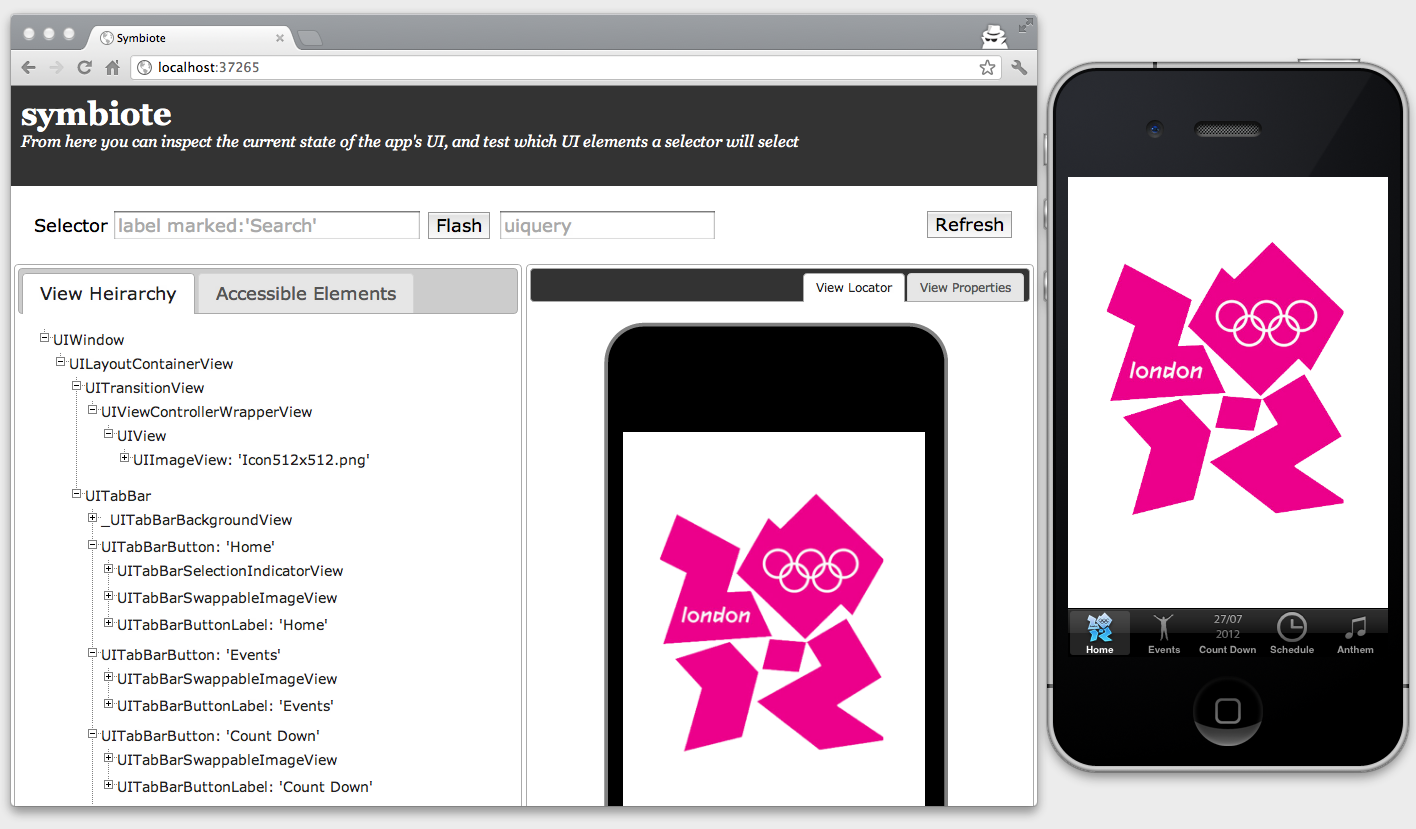
Note that I have the actual iOS Simulator side-by-side with my web browser. That’s useful when testing view selectors in Symbiote, because the main way of testing selectors is to flash the views in the simulator which match a selector. Let’s try that now. Type view marked:'Events' into the selector field at the top left of Symbiote in the web browser, and then hit the Flash button. You should see the Events button in the simulator flash. Congratulations, you are using Frank to manipulate specific parts of your iOS app.

running our first cucumber test

Our goal is to use Frank and cucumber to run automated tests against our app. The frank setup command provides an initial cucumber test for you so that you can verify that cucumber is working correctly in your system. First off we need to tell cucumber where our Frankified app is located so that cucumber can launch the app at the start of each test scenario. To do this, open up Frank/features/support/env.rb. At the bottom of that file you’ll see a TODO comment about setting the APP_BUNDLE_PATH. Replace that section of the file with something like this:

1
APP_BUNDLE_PATH = File.expand_path( '../../../frankified_build/Frankified.app', __FILE__ )

This tells Frank the location of your Frankified app, relative to that env.rb file. Now that we have done that we can run the initial cucumber test that was provided as part of frank setup. To do that simple run cucumber in a terminal from the Frank subdirectory. When you do that you should see the Frankified app launch in the simulator, and then perform some rotations. You’ll also see some output in the terminal from cucumber describing the test steps it has performed and eventually declaring the test scenario passed.

writing our own cucumber test

All right, now that we know how to run cucumber tests we should write our own. We’re going to write a cuke test which verifies that the tab navigation buttons in our example Olympics app work correctly. We’ll write these tests in a new feature file called Frank/features/navigation.feature. Create that file with the following content:

navigation.feature
1
2
3
4
5
6
7
8
Feature: Navigating between screens

Scenario: Moving from the 'Home' screen to the 'Events' screen
Given I launch the app
Then I should be on the Home screen

When I navigate to "Events"
Then I should be on the Events screen

This expresses a test scenario. Now let’s ask cucumber to test just this feature by running cucumber features/navigation.feature. You should see the app launch, but then cucumber will complain because it doesn’t know how to execute any of the steps we’ve described after launching the app. That’s fair enough; we haven’t defined them anywhere yet! Let’s do that now.

Create a step definition file called features/step_definitions/navigation_steps.rb. When cucumber encountered the undefined steps just now it outputted a bunch of boilerplate code for defining those steps. We’ll cut and paste that code into our new step definition file. You should end up with this:

navigation_steps.rb
1
2
3
4
5
6
7
8
9
10
11
Then /^I should be on the Home screen$/ do
  pending # express the regexp above with the code you wish you had
end

When /^I navigate to "(.*?)"$/ do |arg1|
  pending # express the regexp above with the code you wish you had
end

Then /^I should be on the Events screen$/ do
  pending # express the regexp above with the code you wish you had
end

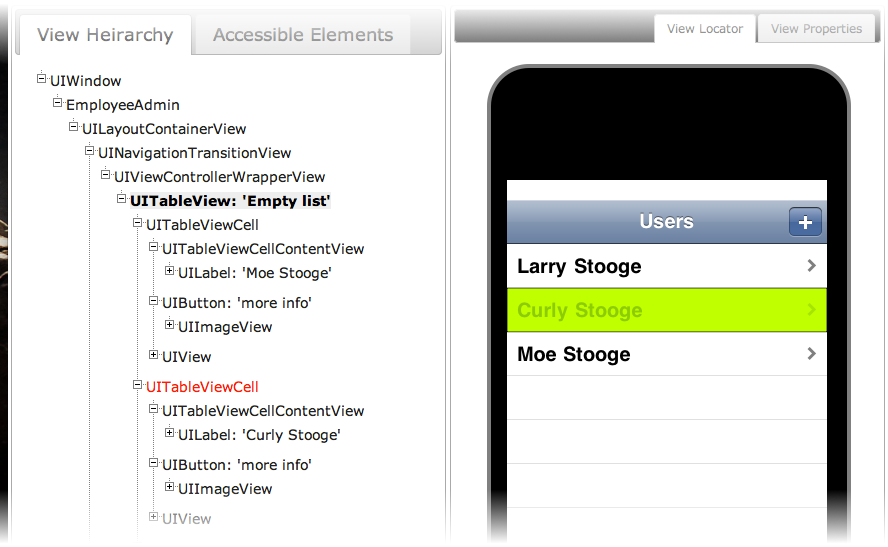
Now we’re going to implement these step definitions one at a time. Let’s start with the first one. We need to check that we are on the home screen. Looking at the home screen in Symbiote it consists of a big UIView with a UIImageView inside of it called Icon512x512.png. Our test can verify that the app is displaying the home screen by checking whether that UIImageView is in the view heirarchy. If it is then presumably we’re on the home screen. If we don’t see that view then we’re not on the home screen. This isn’t an ideal way of verifying where we are - for a start that image view should have a better accessibility label which would make our tests less brittle and coincidentally also make the VoiceOver experience better - but it will do for now.

To test whether a view exists we create a view selector which selects a UIImageView with the correct accessibility label and then we ask frank to verify that that selector matches at least one view. The entire step definition will look like this:

1
2
3
Then /^I should be on the Home screen$/ do
  check_element_exists "view view:'UIImageView' marked:'Icon512x512.png'"
end

Now when we run the cucumber feature again with cucumber features/navigation.feature we should see that step show up as green and passing in cucumber’s output. We are indeed at the Home screen at launch, and our test has verified that. One step down, two to go!

Next we need to define the step which navigates to a specific tab. To do that we’ll ask frank to touch the appropriate tab button in the UI. Looking in Symbiote it appears that those buttons are implemented as views of class UITabBarButton. We can also see that UIKit is giving them nice acccessibility labels. This means all we need to do to implement this step is something like this:

1
2
3
When /^I navigate to "(.*?)"$/ do |tab_name|
  touch "view:'UITabBarButton' marked:'#{tab_name}'"
end

If I run the feature again with cucumber I should see that step executing and taking us to the Events screen in the UI.

Now we’ll write our final step definition. We need to check that we are on the Events screen. Back in Symbiote if we inspect the view heirarchy for that screen we see a UIScrollView which contains a bunch of different buttons for the different Olympic events. I suppose a reasonable check for whether we’re on this screen would be to look for a few of those buttons. Again, this isn’t ideal but it should work pretty well. Here’s our step definition for that:

1
2
3
4
5
Then /^I should be on the Events screen$/ do
  check_element_exists "view:'UIScrollView' view:'UIButton' marked:'archery'"
  check_element_exists "view:'UIScrollView' view:'UIButton' marked:'badminton'"
  check_element_exists "view:'UIScrollView' view:'UIButton' marked:'boxing'"
end

And with that we are done. Running our feature again should result in a green, passing cucumber test. Hurray, we have written our first Frank test!

Don’t forget to refactor

Hang on, before we rush out to celebrate let’s clean up a bit. That last step has loads of duplication in it. Let’s refactor it a bit to this:

1
2
3
4
5
Then /^I should be on the Events screen$/ do
  %w{archery badminton boxing}.each do |expected_label|
    check_element_exists "view:'UIScrollView' view:'UIButton' marked:'#{expected_label}'"
  end
end

That seems a bit cleaner to me. We run our tests again to make sure we’re still green.

Now we can go out and celebrate our first Frank test!

Where to turn for help

Frank is a pretty powerful tool, and it does take time to learn the nooks and crannies of Frank. This is particularly true if you are also new to ruby and/or cucumber.

testingwithfrank.com has documentation, screencasts, and links to more resources.

The frank mailing list is a particularly great resource. Lots of folks there have gone through the same learning process you will go through, and are happy to help.

Lowering Frank’s Barrier to Entry

| Comments

I’ve always known that it’s really important new users of Frank to easily get started by creating a Frankified version of their app - a build which has been enhanced with the embedded server which lets Frank do its magic.

When the project was first started it was really quite complex to setup. You had to add a bunch of source code to your app, and then modify a few bits of your app’s startup code.

After a while, with the help of some Objective C big-brains like Stew Gleadow, the steps need to Frankify your app were simplified. You ‘just’ needed to duplicate your app’s main target, link in a static library and a resource bundle and add a few linker flags. Note that I put ‘just’ in quotes there. While this definitely helped make it less intimidating I still thought that there were many potential users of Frank who were missing out because they hit some snag or other while getting started.

While I was at WWDC this year I took the opportunity to investigate ways to make Frank even easier to get started with. I asked some questions in the labs and got some great advice from some of the Xcode team. I was also stoked to meet a bunch of other non-Apple Objective C big-brains, once again courtesy of Stew.

Zero-config Frank

A couple of days of post-WWDC hacking later, and I’m pleased to announce a new zero-configuration Frank setup. You can now create a Frankified version of your application without touching your Xcode project at all, using a simple frank build command. Here’s a screencast showing how it works.

Benefits

To my mind the biggest benefit is that this will help grow the community of Frank users by reducing the barrier to entry. It also means you no longer need to maintain a duplicate Xcode target, and therefore no longer need to make sure that .m files included in one target are also included in the other.

How does it work

There’s actually not much magic going on here. The concept is to leave the Xcode project as-is and instead just use xcodebuild to build a customized version of the app. That essentially just means adding a few linker flags and linking in a few static libraries and frameworks. This is all specified in a frankify.xcconfig file. We also specify a few other xcodebuild flags so that the app is built into a known location inside of the Frank subdirectory. This is much nicer than having to hunt around for it in the DerivedData dirs that Xcode 4 introduced.

Aside from the xcodebuild bits the main chunk of work was in creating a Thor-based command line tool with the cunningly original name frank. This is installed as part of the frank-cucumber gem, just like the (now deprecated) frank-skeleton script was. This command line tool provides commands for setting up a Frank directory inside your app project and building the Frankified app using the custom xcodebuild approach I just described. There are also commands for updating the frank server code, launching your frankified app in the simulator, opening Symbiote in the browser, and for launching a frank console. You can run frank help for more details.

The frank console

Another thing I added as part of this goal of making Frank easier to use is frank console. This is some very minimal code which uses Pry to bring up a simple ruby REPL that has the Frank helper code already mixed in. This will hopefully give more technical users a nice way to quickly prototype ruby test code against a running instance of their app. I demonstrate the basic functionality in the screencast above.

The Birth of a Domain Object in Ruby

| Comments

Software designs don’t pop into existance fully formed. They evolve over time. In this post I’m going to show how a concept can grow from a simple method parameter to an all-growed-up Domain Object.

Initial requirements

Imagine we’re building some code that will take bug reports from a user and submit them to a third-party bug tracking service. We expose an HTTP endpoint in a sinatra app to allow this:

1
2
3
4
5
post '/bug_report' do
   bug_description = params[:bug_description]

   BugFiler.report_bug( bug_description )
end

So far so good. We’ll assume that BugFiler is some service code that takes a bug description string and makes the appropriate service call to create a bug with that description in our bug tracking system. We won’t be focussing on the implementation of that class here, we’ll just be a client of it.

So a concept that’s starting to surface here is that of a Bug. So far it is represented by a string primitive and that’s OK because that’s all we need right now. Some java programmers would leap to their IDE keyboard shortcuts at this point and fix this Primitive Obsession code smell by refactoring this string primitive into a Bug type. But we’re ruby programmers, so we won’t do that. We’re pragmatic. YAGNI.

New requirements

Now our product guys have realized that it’d be nice to know who is submitting these bug reports. They’d like us to record the name of the person filing the report. OK, we can do that.

1
2
3
4
5
6
post '/bug_report' do
   bug_description = params[:bug_description]
   bug_reporter = params[:reporter]

   BugFiler.report_bug( bug_description, bug_reporter )
end

You can assume that we also modified BugFiler#report_bug to take that second arg.

So now we’re good. New requirements are satisfied and we can move on to our next task.

More new requirements

Oh actually, the product folks have realized we should really be tracking severity too. OK.

1
2
3
4
5
6
7
post '/bug_report' do
   bug_description = params[:bug_description]
   bug_reporter = params[:reporter]
   severity = params[:severity]

   BugFiler.report_bug( bug_description, bug_reporter, severity )
end

So this works, but now alarm bells are ringing for me. 3 params is about my limit for maintainable code. Let’s change BugFiler#report_bug to take a hash instead.

1
2
3
4
5
6
7
8
9
10
11
post '/bug_report' do
   bug_description = params[:bug_description]
   bug_reporter = params[:reporter]
   severity = params[:severity]

   BugFiler.report_bug({
     :description => bug_description,
     :reporter => bug_reporter,
     :severity => severity
     })
end

A bit more verbose, but I’d say more readable too.

Default severity

Turns out that sometimes a user doesn’t bother to explicitly specify a bug severity, so we should set that to a default of ‘medium’ by default.

1
2
3
4
5
6
7
8
9
10
11
post '/bug_report' do
   bug_description = params[:bug_description]
   bug_reporter = params[:reporter]
   severity = params[:severity] || 'medium'

   BugFiler.report_bug({
     :description => bug_description,
     :reporter => bug_reporter,
     :severity => severity
     })
end

Deriving a bug summary

Our product friends are back. Turns out that our third party bug tracker allows us to specify a summary line describing the bug, but we don’t currently have any UI exposed which lets users specify that summary. We’d like to work around this by just clipping the first line of text from the bug description and using that as the bug summary. OK, I think we can do that.

1
2
3
4
5
6
7
8
9
10
11
12
13
14
post '/bug_report' do
   bug_description = params[:bug_description]
   bug_reporter = params[:reporter]
   severity = params[:severity] || 'medium'

   bug_summary = bug_description.split("\n").first

   BugFiler.report_bug({
     :description => bug_description,
     :reporter => bug_reporter,
     :severity => severity,
     :summary => bug_summary
     })
end

Replacing Primitive Obsession with a Struct

Now at this point I think we have too much logic in our controller code. It feels like we have the beginnings of a domain object here. We don’t want to disturb too much code as we initially introduce this new object, so we’ll just replace the primitive hash we currently have with a Struct.

1
2
3
4
5
6
7
8
9
10
11
12
13
# elsewhere in the codez
Bug = Struct.new(:description,:reporter,:severity,:summary)

post '/bug_report' do
   bug_description = params[:bug_description]
   bug_reporter = params[:reporter]
   severity = params[:severity] || 'medium'

   bug_summary = bug_description.split("\n").first

   bug = Bug.new( bug_description, bug_reporter, severity, bug_summary )
   BugFiler.report_bug( bug )
end

We’ve used ruby’s built in Struct facility to dynamically generate a Bug class which takes some parameters at construction and then exposes them as attributes. This type of class is variously referred to as a DTO or Value Object.

Note here that we would have also modified BugFiler#report_bug to expect a Bug instance rather than a raw hash.

Introducing a Domain Object

We now have a Bug class, but it’s just a boring old Value Object with no behaviour attached. Let’s move the logic which is cluttering up our controller code into our Bug class.

1
2
3
4
5
6
7
8
9
10
11
12
13
14
15
16
17
18
19
# elsewhere in the codez
class Bug < Struct.new(:description,:reporter,:severity)
  def summary
    description.split("\n").first
  end

  def severity
    super || 'medium'
  end
end

post '/bug_report' do
   bug_description = params[:bug_description]
   bug_reporter = params[:reporter]
   severity = params[:severity]

   bug = Bug.new( bug_description, bug_reporter, severity )
   BugFiler.report_bug( bug )
end

This is one of my favorite ruby tricks. We define the class Bug which inherits from a dynamically created Struct class, and then we add in some extra behavior. This way we don’t have to write boring initialize methods or attr_accessor code in our class definition, and our intent is clearly captured by the use of Struct.

Solidifying our Domain Object

Now that we have a Bug, why don’t we allow it to file itself?

1
2
3
4
5
6
7
8
9
10
11
12
13
14
15
16
17
18
19
20
21
22
class Bug < Struct.new(:description,:reporter,:severity)
  def summary
    description.split("\n").first
  end

  def severity
    super || 'medium'
  end

  def file_report!
    BugFiler.report_bug(self)
  end
end

post '/bug_report' do
   bug_description = params[:bug_description]
   bug_reporter = params[:reporter]
   severity = params[:severity]

   bug = Bug.new( bug_description, bug_reporter, severity )
   bug.file_report!
end

That seems quite nice. We have some controller logic which doesn’t do much apart from transform params into an object and then call methods on that object.

Our end state

At this point we have the beginnings of a real Domain Object in our Bug class. In the future we could add the ability to serialize a Bug instance to a flat file or a database, and not really need to touch our controller code. We can also test all of the business logic without needing to thing about HTTP mocking, Rack::Test, or anything like that.

I’ve noticed that domain concepts follow evolutionary paths like this quite frequently. In this case our path was:

  • a single parameter
  • a group of parameters
  • a hash object
  • a hash object plus some unattached logic
  • a value object plus some unattached logic
  • a domain object with attached logic

YAGNI!

Something I tried to get across as we worked through this scenario was the importance of taking YAGNI approach to software design. It is very tempting to start introducing domain objects as soon as you see a potential for them, and it’s fun to do so. But a lot of the time you don’t ever need to go this far down the path towards a real domain object. If you don’t need to attach any behaviour then a lot of times a simple hash is just fine.

Feature Flags in JavaScript

| Comments

On a recent project we were applying Continous Delivery practices and were releasing to production reasonably frequently - sometimes multiple times a week. We didn’t want to expose features which were under active development in our production environment but we also wanted to avoid feature branches. I’m going to describe the simple approach we used to solve this problem using feature flagging with javascript and CSS.

What are feature flags?

Features flags (aka feature bits, feature toggles) are a very useful technique for managing latent functionality within your application. You expose switches in your application which configure whether certain behavior is enabled or disabled. Typically your would use this pattern for functionality which is under active development and is not ‘fully baked’.

There are various classes of behavior which you might expose toggles for. Common use cases include hiding user-facing features which are still in development, or switching whether your code uses a new version of a third-party service. This allows you to do branch-by-abstraction and therefore avoid long-lived feature branches which can often be the source of considerable pain to a development team.

Further reading

For a more in-depth discussion on this pattern, Martin Fowler has a nice writeup. My former colleague Erik Sowa also has a nice presentation describing how we applied ‘feature bits’ at a previous company I worked in. Derek Hammer has a really nice write up on the broader range of patterns available for isolating code when practicing Continous Delivery.

Feature flagging using query strings, javascript and css

As mentioned above, I’ll be describing a simple but effective feature flagging technique we used on a recent project. Our team decided to use feature-flagging to hide new features at the UI level using CSS. The mechanism to toggle the features on and off involved query strings and some simple javascript.

step 1: extracting feature flags from the query string

First we needed some way to specify whether a feature flag was on or off. We used query params to do this. These query params were totally ignored by the server-side code. There were just there so that javascript on the client side could inspect them at page load.

1
2
3
4
5
6
7
8
9
10
11
12
13
14
15
16
17
18
19
20
21
22
23
24
25
function parseQueryParamPart(part){
  var keyAndValue = part.split("=");
  return {
    key: unescape(keyAndValue[0]),
    value: unescape(keyAndValue[1])
  };
}

// returns an array of {key:"",value:""} objects
function getQueryParamKeyValuePairs(searchSection){
  var params = searchSection.slice(1).split("&");
  return _.map( params, parseQueryParamPart );
}

function getFeatureFlags(){
  var queryParamKeyValuePairs = getQueryParamKeyValuePairs( window.location.search );

  return _.compact( _.map( queryParamKeyValuePairs, function(pair){
    if( pair.key === 'ff' )
      return pair.value;
    else
      return undefined;
    end
  }));
}

Here we do some simple parsing of window.location.search with the help of underscore.js (my favorite javascript library of all time). We find all query params that have a key of ‘ff’ and return the values in an array. Note that query params may have multiple identical keys; we handle that by representing the parsed key-value pairs as an array of key-value pairs, rather than the simplistic approach of creating a hash table directly from the query string.

step 2: expose feature flags as classes in the DOM

1
2
3
4
5
$(function(){
  _.each( getFeatureFlags(), function(featureFlag){
    $('html').addClass( "ff-" + featureFlag );
  });
});

Here we use jQuery to register a function on document ready. This function will grab all the feature flags specified in the query params and then add a class to the doc’s <html> element for each flag, prepended with ‘ff-’ to avoid any naming collisions with other CSS classes.

step 4: show or hide UI elements with CSS

Our goal here is to control whether or not a feature is exposed to an end user. A lot of the time we can hide a feature by simply applying a display:none the right DOM element. Because we added our feature flag classes to the root <html> element we can apply simple CSS rules like the following:

1
2
3
4
5
6
7
.search-wrapper {
  display: none;
}

.ff-search .search-wrapper {
  display: block;
}

This will hide the search-wrapper element (and anything inside of it) by default, but will show it if there is a parent with a class of ff-search. Combined with the javascript above this has the effect that search functionality will be hidden unless you pass in a query params of ff=search when loading the page. There we have it, a simple feature-flag.

Further refinements

This simple approach works quite nicely for a single-page app (which is what our team was developing), but it does have some issues in other cases. The main problem is that any feature flag you specify in a query param will be lost whenever you leave the current page. This could be remedied by storing feature flags in a cookie or in HTML5 local storage. You’d then check for flags in that store in addition to in the query param during page load. Presumably a flag specified in a query param would override anything in the store.

I’ve only covered using a feature flag to drive CSS changes, but you could easily expose a simple javascript API which would allow developers to plug in different code based on whether a flag was off or on. In sophisticated use cases you would probably use feature flags to drive the initial wiring up of your code’s dependencies during boot.

Moving From Blogger to Octopress

| Comments

Yes, like many other dork bloggers I’ve jumped onto the Octopress bandwagon.

A big concern I had with switching blogging platforms (I was previously on Blogger) was breaking links to my existing content. Part of my concern was in losing Google Juice (yes, I’m that vain), but I’m also aware that a couple of my posts about Frank have become sources of documentation which are linked to from a few different places on the web. I definitely did not want to break those links.

That said, my worries appear to have been groundless. I’ve been very plesantly surprised at how easy it has been to import my old posts into Octopress, maintaining the same urls. The first step was to export my existing content from Blogger. I went to the Settings section in my blog’s admin pages and chose Other > Blog Tools > Export blog). Then I pulled down a copy of this ruby script I found via a quick google search, and ran it against that exported file from Blogger. It very quickly generated a bunch of static posts from the exported Blogger data. It even used the same path format that Blogger uses, so no problem with broken links. Neat.

All in all, I’d say it took about 20 minutes to go from cloning the octopress repo to browsing all my old Blogger content in my shiny new Octopress blog. Really a very smooth experience.

Class-less Javascript

| Comments

It seems that every javascript framework of a certain size is compelled to implement some kind of pseudo-classical type system. I am now fairly convinced that there is no good reason for doing so. I’d like to describe an alternative approach to dealing with types in JavaScript.

This approach comes from a recent project where my team was building a pure-JavaScript single-page web application. This wasn’t a huge codebase, but due to the single-page nature of the app it did have a reasonable amount of non-presentation logic which was implemented client-side in JavaScript. We needed a type system but we knew we didn’t want to try and force a classical-OO system onto JavaScript. The patterns we evolved gave us just enough structure while still allowing us to take advantage of the highly flexible and dynamic nature of JavaScript.

In this post I’ll be summarizing the major parts of the lightweight, class-less type system we created. Before that I’ll start with a brief tour of JavaScript, covering language concepts which are relevant to our approach. If there is sufficient interest in this topic I may write this up in more detail here over a series of posts.

A quick tour of JavaScript

Prototypical, not Classical

JavaScript is not a classical Object-Oriented language. Over the years many have tried to force it into that mold, but it just doesn’t fit. In JavaScript typing is achieved through the use of prototypes, not classes.

In languages like Ruby or Java you have Classes and Objects. An Object is always the instance of a specific Class. You generally define an object’s behaviour by specifying that behaviour in the object’s class (for the sake of clarity I’m glossing over things like ruby’s eigenclass). On the other hand in JavaScript an object’s type is not determined by its class, but is instead based on the object’s prototype. Unlike classes, a prototype has no special qualities. Any object can act as the prototype for another object. A prototype is not distinct from other objects, nor does it have a special type.

In a classical OO language an object derives behaviour and state-shape (i.e. member variables) from its class, and also from superclasses of its class. In JavaScript, an object derives behaviour from its prototype and also from its prototype’s prototype, and so on up the prototype chain.

Objects are just a bag of key-value pairs

JavaScript objects are in essence just a dictionary of key-value pairs called properties (plus a prototype as described above). Public object state is added directly to the object as a property, and object methods are simply a function which has been added directly to the object (or its prototypes) as a property.

Closures as an alternate source of per-instance state

Storing state directly in an object via its properties would mean that that state is publicly accessible in a similar fashion to a public instance variable in an OO language. This has the same drawbacks as in other languages (uncontrolled access, unclear public interfaces, etc.). To avoid this pitfall a common idiom used in JavaScript to control access to state is to instead store that state outside of the object itself, but rather as local variables of the function which created that object. Due to the scoping rules of JavaScript those local variables are closed over by the object, and are thus available for access and modification.

closure-encapsulates-object-state.js
1
2
3
4
5
6
function createDuck( name ){
  var duck = {
    fullName: function(){ name + " duck"; }
  };
  return duck;
};

Note that the duck instance we create is not storing its name anywhere inside the object. Instead the name argument passed to the createDuck function has been closed over, and is accessible to that duck instance. Also note that the value of name is therefore private. In fact it is private in a very strong sense. It is impossible for any client of the duck instance to see or modify the value of that name variable. No tricks of reflection or runtime object manipulation can get around this. Interesting sandboxing systems such as Caja have been built up around this property of JavaScript.

A lightweight type system for JavaScript

Constructor functions, not classes

In a typical OO system you would define the types in your system using classes such as Duck, Pond, Food, etc. The orthodox approach in JavaScript would be to define types using prototypes. In our approach we do neither. We have no classes or prototypes, just constructor functions. Each type in the system has one or more constructor functions which create instance of that type. So we would have createDuck(…), createPond(…), createFood(…).

The closure code sample above shows the general form these constructor functions take. The equivalent of methods and member variables are defined inside the constructor function and at the tail end of the function an object with references to the methods is created and returned.

State via closure

As mentioned earlier, storing state directly in object properties is analogous to having public instance variables. There are very few cases where this is a good idea. Instead our objects maintain state via closed-over local variables declared in the object’s constructor functions. In this way object state is private and encapsulated but still available for manipulation by the object’s functions, because they are declared in the same constructor function. Access to state is exposed in the public interface of a type instance via these functions which are added to the returned object, becoming ‘methods’ on that instance.

Mixins for shared public behaviour

In JavaScript public ‘methods’ are just functions added to an object as a property. This means you can easily mix in new public behaviour by just merging the contents of the a mixin object with the instance itself. For example:

extending-with-mixins.js
1
2
3
4
5
6
7
var shouter = {
  shout: function(){ return this.speak().toUpperCase(); }
};

function createShoutyDuck( name ){
  return _.extend( createDuck(name), shouter );
};

Here we have a shouter mixin and a createShoutyDuck constructor function which uses that mixin to construct a new type of duck which can shout. The constructor achieves this by using the methods defined in shouter to extend the duck type that is defined by the createDuck constructor function. We often use this pattern as an alternative to implementation inheritance. Instead of a base class which provided standard behaviour and subclasses which layer on additional behaviour we instead would have a base mixin which provides standard behaviour and constructor functions which define types by mixing together that standard base behaviour with additional type-specific behaviour. It’s also interesting to note that as well as using mixins to extend a type via a constructor function it is also possible to extend specific instances of a type with mixed in functionality on an ad-hoc basis. This allows interesting dynamic patterns such as mixing in ‘admin’ methods to a specific instance of a User type once they have been authorized as an admin via a service call.

Namespacing

We follow the standard practice in large JavaScript codebases of namespacing using the module pattern. Coupled with our other practices, this means that a module will generally only expose a small number of constructor functions to other parts of the system. Inside a namespace we may have quite a few types (and thus constructor functions), but across module boundaries only a few types are shared, and thus only a few constructor functions exposed. This is a natural outcome of following the time-honored practice of organizing modules with low coupling and high cohesion in mind. Global variables are avoided at all costs, and pseudo-global variables (i.e. raw variables tacked on to a top-level namespace) are considered a design smell.

Dependencies

Dependencies are wired together in an initial boot function. Because this function’s role is to connect large modules together it has a side-effect of documenting in a relatively declarative, high-level way how the various parts of the system depend on each other.

Dependencies are generally hooked in by providing constructor functions as parameters to other constructor functions. As well as directly passing constructor functions, it’s also quite common that partially-specified constructor functions are used to encapsulate lower-level or cross-functional dependencies. Here’s another contrived example:

currying-and-constructor-functions.js
1
2
3
4
5
6
7
8
9
10
11
12
13
14
15
16
17
18
19
20
21
function createLogger( category ){
  // some implementation here
};

function createDuck( name, logger ){
    return {
      speak: function(){
        logger( name + ' was asked to speak' );
        return 'quack';
      }
    };
};

(function boot(){
  var duckLogger = createLogger('duck');

  function curriedCreateDuck(name){
    return createDuck( name, duckLogger );
  }
  globals.createDuck = curriedCreateDuck;
}());

This example shows two distinct applications of currying. First, we have exposed a curried createDuck function to the outside world, with the logger dependency hidden. We also used a curried createLogger function called duckLogger to pass to the createDuck function. Again this was to remove cross-functional implementation details (about logging in this case) which the createDuck constructor should not be aware of or care about.

There is a strong similarity between our use of partially applied functions and the parameterized Factory classes you see quite often in statically typed OO code (particularly Java).

A notable advantage of this dependency injection approach is that modules can easily be tested in isolation by injecting test doubles in place of real dependencies.

Outcomes

Composition over Inheritance

A slightly unfortunate side-effect of capturing our instance state in closures is that it is hard to expose that state to mixins and sub-classes, as the state is only available via lexical scoping and is not available via the this keyword. Another way of putting this is that there is no equivalent of the ‘protected’ scope found in a language like C++ or Java. This leads to a favoring of composition over inheritance/mixin when it comes to sharing common behaviour between types. Instead of mixing in behaviour that requires access to private state we would wrap that behaviour in a helper object. That helper object would be available to types which need it via their constructor function. Instances of those types would then call out to that helper object as needed, passing in the private state needed by the helper to provide its functionality. Sort of a ‘tell-don’t-ask’ approach to using shared behaviour.

No prototypes, no new, less this

By following this approach to creating types we’ve found no need for the prototypical type system built into JavaScript. Our code does not use the new operator at all, except when interacting with libraries or frameworks which require the use of new to instantiate objects.

The lack of new also means usage of the this keyword becomes less frequent. References from a method’s implementation to member variables or to other methods in a type are mostly achieved via lexical scoping. this is only really needed when writing mixins which achieve their work by calling hook methods implemented in the instances they are mixed into - see the shouty duck sample above for an example of that.

Conclusion

I have been honestly rather surprised at how well this class-less approach has worked. I would certainly use it (and refine it) in future JavaScript projects.

I’d love to hear feedback on what I’ve outlined here. If there is interest I may write some follow-up posts diving into more detail on some of the aspects I’ve touched on here.

Testing Mobile Web Apps With WebDriver

| Comments

Intro

We’ve been building mobile web apps using JQuery Mobile with the main target being webkit-based mobile browsers - Android and iPhone, basically. We’re big fans of functional testing, so we spent some time figuring out how to get a good testing infrastructure set up for mobile app development. That’s what I’ll be sharing here.


The approach


Our team members have a lot of experience using Cucumber to write automated acceptance tests, and we’re big fans. In previous projects we were building native iOS apps and testing them using Cucumber and Frank. We wanted to bring over some of the testing infrastructure we already had set up, so we decided on a similar approach. We still use Cucumber to drive tests in the iOS simulator, but instead of talking to a native app using Frank we are talking to our mobile web app via Selenium 2’s remote WebDriver protocol. In order to do this we run a special iOS app provided as part of Selenium 2 called iWebDriver which hosts an embedded UIWebView and listens for WebDriver commands, in much the same way as a Frankified native app listens for Frankly commands. We launch the iWebDriver app using the same SimLauncher gem which we’ve previously used to launch our native app for pre-commit and CI testing. To make our lives easier we use Capybara, which provides a nice ruby DSL for driving web apps and some useful cucumber step definitions out of the box. We configure Capybara to use the selenium-webdriver gem to drive the iWebDriver-hosted web app via the WebDriver remote protocol.


Selenium 2 == WebDriver

Note that when I talk about Selenium here, I am not referring to the Selenium 1.0 system (Selenium RC, Selenium IDE and friends). We are using Selenium 2.0, which is essentially the WebDriver system plus some Selenium backwards compatibility stuff which isn’t used in this setup. We don’t run any kind of Selenium server, we simply run iWebDriver in the iOS simulator. iWebDriver exposes the WebDriver remote API, and our cucumber tests drive our mobile app directly within iWebDriver using that API.


WebDriver on mobile is still bleeding edge

On the whole we have been happy using WebDriver and the iOS simulator to drive our functional tests. However, the WebDriver infrastructure for mobile platforms does feel a little rough around the edges. We have rare cases where our CI test run will fail, apparently due to iWebDriver crashing. When we were first getting our app under test we saw what appeared to be an iWebDriver bug where it was overwriting the global _ variable that underscore.js uses. We worked around that by using underscore.js in no-conflict mode. We also had to add a small but hacky monkey-patch to the selenium-webdriver gem to work around a bug in the way CocoaHTTPServer (the embedded HTTP server that iWebDriver uses) handled a POST with an empty body. That bug has been fixed in more recent releases of CocoaHTTPServer, but frustratingly we got no response when we reported the issue and suggested an upgrade of the dependency to resolve the issue. UPDATE: Jari Bakken notes in the comments that a similar workaround to our monkey-patch has now been added to the selenium-webdriver gem. We also found that iWebDriver locks up when showing a javascript alert. We worked around this by injecting a stub version of window.alert() in our web page at the start of each test. This worked, but is obviously less than ideal.


We briefly experimented with using the Android WebDriver client, but it lacked support for CSS-based selectors at the time. That may have changed since. If you are just using Capybara this is not an issue since Capybara uses XPath under the hood. However we quickly found that our use of JQuery Mobile meant we needed to write a fair amount of custom selectors, and our automation engineers had a preference for CSS. Ideally we would have run our test suite against both the iOS simulator and the Android emulator, but this lack of CSS support led to us deciding to just test on iOS. Given that both platforms are webkit-based this was an acceptable tradeoff.


The last drawback worth mentioning around using the iOS simulator is that it can only be run under OS X, and it doesn’t seem possible to run multiple instances of the simulator at once. This means that parallelizing your tests will involve running multiple OS X host machines, either physical boxes (we have used mac minis successfully) or virtual machines.


Recommendations

All in all I would still recommend a testing approach similar to what I’ve outlined. The extra safety-net that our suite of functional tests provided was just as valuable as in a non-mobile project. While they are not totally polished, iWebDriver and Cucumber are the best way I know of currently to build that safety net.


One thing we didn’t do which I would recommend is to also have your test suite execute against a desktop webkit-based browser, using ChromeDriver for example. Tests will run a lot quicker on that platform, giving you faster feedback. You will likely need to make minor modifications to the way your tests are written, but if you’re running tests in ChromeDriver from day one then you should be able to tackle any small issues as and when they arise. That said, I would absolutely make sure you are also running your full test suite against at least one mobile platform as frequently as you can - there will be issues in mobile webkit browsers that aren’t apparent on a desktop browser.

Javascript Promises

| Comments

One of the interesting aspects of Javascript development is its asynchronous, event-driven nature. Any operation which will take a significant amount of time (e.g. a network request) is non-blocking. You don’t call a function and block until the operation completes. Instead functions are non-blocking - they return before the operation is complete. To obtain the result of the operation you provide callbacks which are subsequently invoked once the operation completes, allowing you to move on to the next stage in your computation. This is a very powerful, efficient model that avoids the need for things like explicit threading and all the associated synchronization problems. However, it does make it a bit harder to implement a set of operations that need to happen one after another in sequential series. Instead of writing:

1
2
3
var response = makeNetworkRequest(),
processedData = processResponse(response);
writeToDB( processedData );

you end up writing:

1
2
3
4
5
6
makeNetworkRequest( function(response){
  var processedData = processResponse(response);
  writeToDB( processedData, function(){
    // OK, I'm done now, next action goes here.
  });
});

This is the start of what is sometimes referred to as a callback pyramid - callbacks invoking subsequent operations passing in callbacks which are invoking subsequent operations, and on and on. This is particularly common in node.js code, because most server-side applications involve a fair amount of IO-bound operations (service calls, DB calls, file system calls) which are all implemented asynchronously in node. Because this is a common issue there have been a rash of libraries to help mitigate it. See for example “How to Survive Asynchronous Programming in JavaScript” on InfoQ.

One approach to help cope with these issues in asynchronous systems is the Promise pattern. This has been floating around the comp-sci realm since the 70s, but has recently found popularity in the javascript community as it starts to build larger async systems. The basic idea is quite simple. When you call a function which performs some long-running operation instead of that function blocking and then eventually returning with the result of the operation it will instead return immediately, but rather than passing back the result of the operation (which isn’t available yet) it passes back a promise. This promise is a sort of proxy, representing the future result of the operation. You would then register a callback on the promise, which will be executed by the promise once the operation does complete and the result is available. Here’s the same example as I used before, implemented in a promise style:

1
2
3
4
5
6
7
8
var networkRequestPromise = makeNetworkRequest();
networkRequestPromise.then( function(response){
  var processedData = processResponse(response),
  dbPromise = writeToDB(processedData);
  dbPromise.then( function(){
    // OK, I'm done now, next action goes here.
  });
});

I created local promise variable here to show explicitly what’s happening. Usually you’d inline those, giving you:

1
2
3
4
5
6
makeNetworkRequest().then( function(response){
  var processedData = processResponse(response);
  writeToDB(processedData).then( function(){
    // OK, I'm done now, next action goes here.
  });
});

For a simple example like this there’s really not much advantage over passing the callbacks as arguments as in the previous example. The advantages come once you need to compose asynchronous operations in complex ways. As an example, you can imagine a server-side app wanting to do something like: “make this network request and read this value from the DB in parallel, then perform some computation, then write to the DB and write a log to disk in parallel, then write a network response”. The beauty of a promise is that it is an encapsulated representation of an async operation in process which can be returned from functions, passed to functions, stored in a queue, etc. That’s what allows the composition of async operations in a more abstract way, leading to a much more manageable codebase.

Retroactive Quality Metrics With Git

| Comments

The Background

For a recent project retrospective we wanted to chart some metrics over the course of the entire project. Things like number of unit tests, test coverage, how long builds took to run, number of failing tests, etc. Taken in isolation these metrics aren’t incredibly exciting, but when you plot them over time and hold that against other metrics like team morale, story point velocity, open defects, etc then often some interesting correlations can emerge.

The Challenge

So, we wanted metrics for internal quality, but we actually hadn’t done the best job at collecting those metrics, particularly at the start of the project. So under pressure to get ready for our project retro we decided that we’d have to pass on graphing the internal quality metrics.

After the retrospective - which was a very valuable exercise regardless - I decided to figure out a way to capture this kind of data retroactively. I reasoned that if we had a script which generated a metric for the codebase at an instance in time then we can easily leverage The Awesome Power Of Git™ to collect that same metric over an entire set of commits.

Find someone else who’s solved 80% of your problem

I came across a script in Gary Bernhardt’s dotfiles repo on github called run-command-on-git-revisions. Sounds promising, doesn’t it? This script will take a given range of git commits and run whatever command you provide on each commit in the range one by one. Just what I needed.

Solve the remaining 20%

I just needed a few additional tweaks. First I created a little 5 line ruby script which ran some test coverage metrics on our codebase, outputting a single line of comma-separated data. Then I created a modified version of Gary’s script. The modified script only outputted raw CSV data, and tacked on the timestamp of each git commit as it processed it. Once that was done all I had to do was kick off the script with the appropriate range of commits, asking it to run my metric reporter script on each commit. I took the output and pulled it into graphing software and now have a pretty graph of how our test code has trended over time.

Inspect the State of Your Running iOS App’s UI With Symbiote

| Comments

What’s Symbiote?

Frank comes with a useful little tool called Symbiote. It’s a little web app which is embedded inside your native iOS application. Its purpose is to let you inspect the current state of your app’s UI, and to test the UIQuery selectors which Frank uses to help it automate your app. Essentially Symbiote is Firebug for your native iOS app.

Recently I’ve added some improvements to Symbiote, adding some new features and making it easier to use. This screencast demonstrates most of the new-and-improved Symbiote.

Main features

View hierarchy

Symbiote provides you with a tree describing the current state of the view hierarchy of your running app. This gives you an overview of the general structure of your app’s UI, and also helps you write UIQuery selectors which drill down from high level UI features to individual UI elements. For example, you might want to find a specific UITableView, and from there drill down to a specific row within that table view.

View properties

After selecting a specific view in the view hierarchy you can see details of that view in a properties tab. Inside this tab is a table describing all the properties exposed by the specific view.

UI Snapshot, with view locator

The View Locator tab shows a snapshot of the current app UI. As you mouse over views in the view hierarchy that view will be highlighted in the view locator, making it easy to visualize which parts of the view tree map to which parts of the app’s UI.

Selector testing

Frank uses UIQuery selectors during testing to select a specific view or set of views. This is very similar to how Selenium uses XPath or CSS selectors. In order to test these, Symbiote allows you to provide free-form UIQuery selectors and then have Frank flash any matching views in your app’s live UI. This makes it a lot easier to test selectors when writing your automated tests.

Accessible elements

Frank makes use of accessibility labels to make it easier for it to find elements in the UI. To that end, Symbiote provides a list of all the views in your current UI which have accessibility labels. You can click on these elements and see the corresponding UI element flash in your app’s running UI, using the same mechanism as the free-from selector input field.

Cool, where do I get it?

That’s easy. Just get your app Frankified, and you’re good to go!

Gracias!

We wouldn’t have what we have today without the original UI cleanup of Symbiote by Cory Smith, and the UX and CSS help of Mike Long.